
Cool Stuff We've Built, Borrowed or Bought
Here's a collection of small simple modifications that has improved our life on the boat and how you can benefit from them too.
- LED Lights!
- Davis Anchor Light Modified with an LED
- Cold Cathode Fluorescent Lamps
- WI-FI Directional Antenna -- Internet at Anchor
- The World's Greatest Cockpit Table
- Make Your Own Boat Cards
- Life-Line Tension -- How tight to make them?
- Sun Shades
- Make your own hookah!
- What's on the horizon?
LED Lights -- Don't waste your money buying other people's LED's!
The photos leave something to be desired, but you get the basic idea.
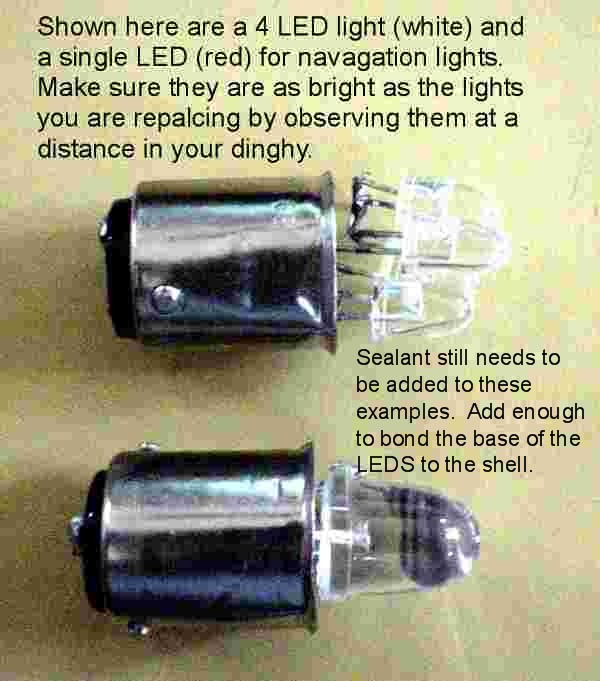
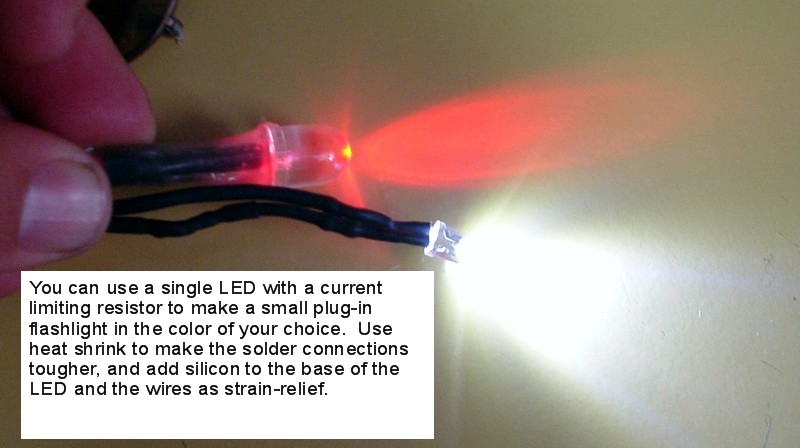
They take about 0.02 A (or 20 mA) to run and they can be quite bright. If you are looking for LEDs to use on your boat, buy the brightest ones you can find, 1500 mcd to 6000+ mcd. The units "mcd" stand for milli-candles, it's a measurement of light power based on the light from a standard candle. Don't waste your time with any LED's that are less than 1500 mcd. Be careful because manufacturers play with the specs by narrowing the "visible cone" to increase the mcd rating. So look for something with at least a 20 degree cone (or larger) and 1500 mcd or more.
To calculate the current limiting resistor, get the specified Vf, (usually 0.7V to 3.5V), If (usually 20mA to 30mA) and use this formula (for a 12V boat):
R = ( 12V - Vf) / (If)So if the LED has Vf = 1.5V and If = 0.03 A, the you can solve for the resistor R = (12-1.5)/0.03 = 10.5/0.03 = 350 ohms. If you can't find a specific size resistor, buy the one that is closest, but not less than the calculated value, so in this case perhaps, 390 Ohms.
Also, don't forget that LEDs only turn on if the current flows in the right direction. This means it is polarized with Positive and Negative terminal. The positive needs to go to the +12V and the negative needs to go to the resistor, then the other side of the resistor needs to connect to negative (or ground). Don't worry if you connect it backwards, it won't break, but it won't light up either. Also, if the LED starts to get hot to the touch, then you'll need to use the next size larger resistor value. The LED should not get hot.
A great source for LED's (and electronics in general) is Digikey or search around on the internet. You can occasionally find some decent ones at Radio Shack, but check their brightness ratings!
Cost per bulb? About $0.10 to $5.00 depending on the color and number of LEDs. Now isn't that better than the $30 to $150 I've seen some places charge?
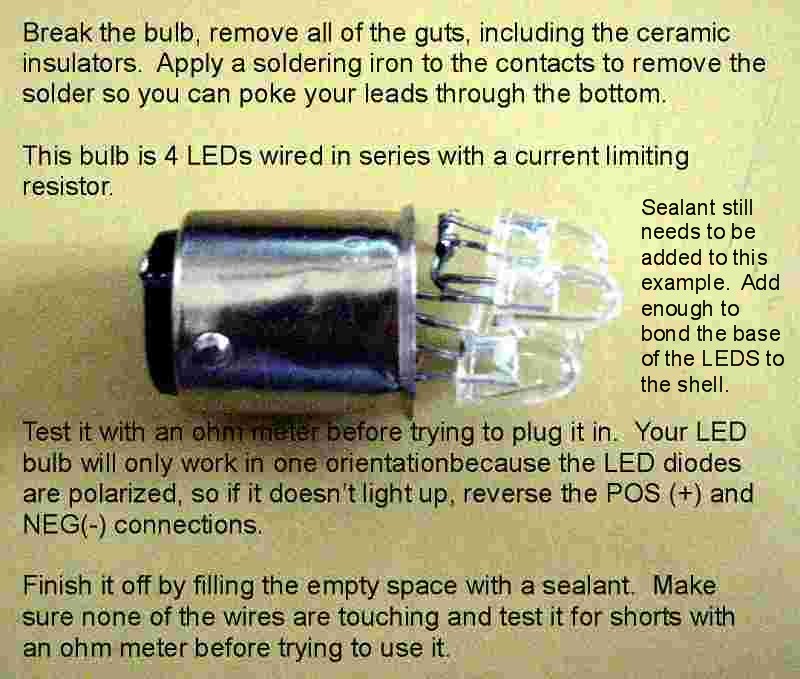
WARNING: If you don't know how to test the bulbs that you've made for shorts with an ohm meter, then don't bother trying to build one. It could short out to the shell of the old bulb and possibly start a fire. However, if you know a little bit about what you are doing and are careful, you can avoid or detect shorts and always seal the entire bulb back up with a sealant, epoxy works nicely. A sealant will prevent the wire leads inside from moving and shorting to the shell. Please read the comments on the example photographs, and proceed carefully, don't have a melt down!
Davis Anchor Light Modified with an LED
Most of the cruisers we know don't use a masthead anchor light. The light is too high above the water and actually makes it difficult to judge the position of your boat from just the light, especially in a pitch black anchorage. Most people have devised their own form of anchor light that they hang lower to the deck. We've seen some pretty clever lights where people used tiny solar powered garden lights on both sides of their boat.
But we liked the Davis light, because it had a light sensor in it that turn it on and off automatically. Pretty cool we thought. It seems that Davis' quality control is pretty poor though. The second day we used it (after forking over $40 and having someone carry it down to us) the light sensor became very temperamental. After a few days of fighting with it, I gave up, and hardwired it to remain on. Now that defeats the purpose of the automatic part of the light, and saving power when the sun came up.
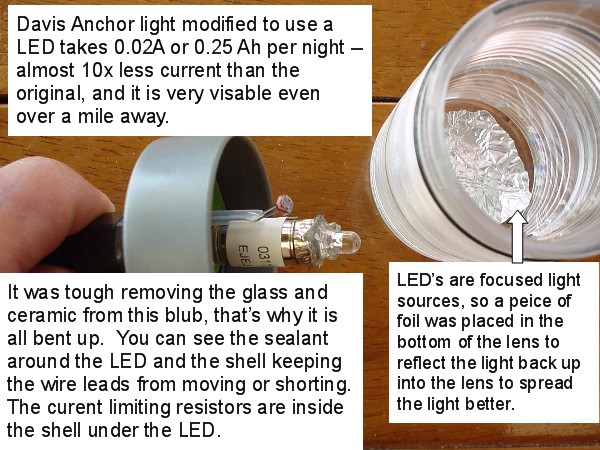
As it turned out, a day later the expensive bulb burnt out. A problem I've heard from a couple other people. So I decided to try to convert it to an LED (my first attempt). I broke the glass bulb, and removed all the fragments, and squeezed the shell to break loose the ceramic insulators in the bottom. Then I applied a soldering iron to the contacts to remove the solder and the wires. Once it was cleaned out, I set to work putting in the current limiting resistor and connecting the LED. Once I had them soldered into place and cleaned up, I tested it with the lens. I had to adjust the height of the LED in the socket to make sure I had it centered when the lens was in place to increase the brightness as the lens helps spread the light outward. Once I got the height right, I sealed up the shell by filling it with silicon.
Then I added some foil in the bottom of the lens to reflect the LED light back up into the lens to increase its brightness out the sides. After everything was cured, I put it all back together, hung it up, and checked it out from the dinghy. It looked bright and only 0.02A!
Cold-Cathode Fluorescent Lights

If you need a little better light for general reading, try a CCFL. You can buy them from people who specialize in customizing PC cases (off Ebay for about $5 each). Believe it or not: there's a trend for clear cases on computers and people put these lights inside them. They are small and only pull about 0.2A. You can get them in Red, White, Green, Blue and probably a few other colors. They are extremely efficient and will pump out tons of light. You can find 12V versions of them all over the internet. Look for "PC Mods" and "fluorescent" or try XPCgear.
The light tube itself runs on 500+ Volts AC. That's not a typo, 500Vac. The little transformer converts 12Vdc to 500Vac and lights up the tube. The transformers are referred to as CCFL drivers. Some of them have built in dimming so you can adjust the brightness -- very nice. They can create some interference with SSB radios, but we haven't noticed a problem because they are very low power (so less electrical noise) compared to the larger Hot Cathode Fluorescent bulb you can buy everywhere. You can also find CCFL drivers with a dimmer option for that classy mood-lighting touch.
The lamp shown in the picture is smaller than a #2 pencil and pulls about 0.22A. A creative person could make a case for them, or make them into some really bright navigation or anchor lights, especially since they come in different colors.
These are the same type of lights sold by Taylorbrite (not Alpenglow, sorry I got that screwed up earlier!) . You can buy these for about $5 to $10 and make your own fixture.
Wireless WI-FI at Anchor? Build a directional antenna to focus in on the internet! 
Ok, you're on the outside pier at a fancy marina with wireless. Great! Unfortunately the wireless signal is too poor for you to pick up and you don't want haul your computer all the way down the dock in search of a connection? Pull our your directional antenna and you might be able to connect. Some people insist you can't use one of these at anchor because you're swinging around. Not true! If you want to make a connection for 5 to 10 minutes to get weather, send email, etc. it's very easy to do. If you want longer connect times, just get someone to point the antenna while you work on the computer! We're living proof it works!
We built this circular waveguide (our "can" directional antenna) out of some large cans and some aluminum tape. It took about 20 minutes and it gives us a range of about 0.5 to 1.0 miles depending on the conditions. We regularly get a connection at distances 3 to 4 times further than other people and we have a very low power Wifi unit.
You do need a wireless device that is connected with a USB cable. This way you can place the wireless box inside the "can" without having to build a pickup and a cable for a built-in wireless antenna. If you click on the photos to the left, you'll see what I'm talking about. The direction antenna works like a magnifying glass for your WI-FI device. You have to point it at the station you want to connect to, it focuses the radio waves down the inside of the cans to the end where you need to place your WI-FI device. If you have a USB type of WI-FI device, you can just place it in the end of the cans, simple clean, done.
So how do you know how big of cans and how many to use? I found a nice spreadsheet on the internet about circular waveguides. You can download the spreadsheet here. There are examples of what works, and what the limits are. Basically you need something that is about 3.6" wide and 19" long.
Our antenna is about 3.9" by 18". The USB WI-FI modem we use is an old SMC SMC2664W device. Cheaper, newer USB WI-FI devices are all over the market.
If you want to just buy something, try the Hawkings Products for wi-fi they have built in directional antennas too.
You could also try adding a parabolic reflector to your external antenna at the access point site (the internet box thingy). It's a great idea, easy to make and would improve your gain dramatically.
The World's Greatest Cockpit Table
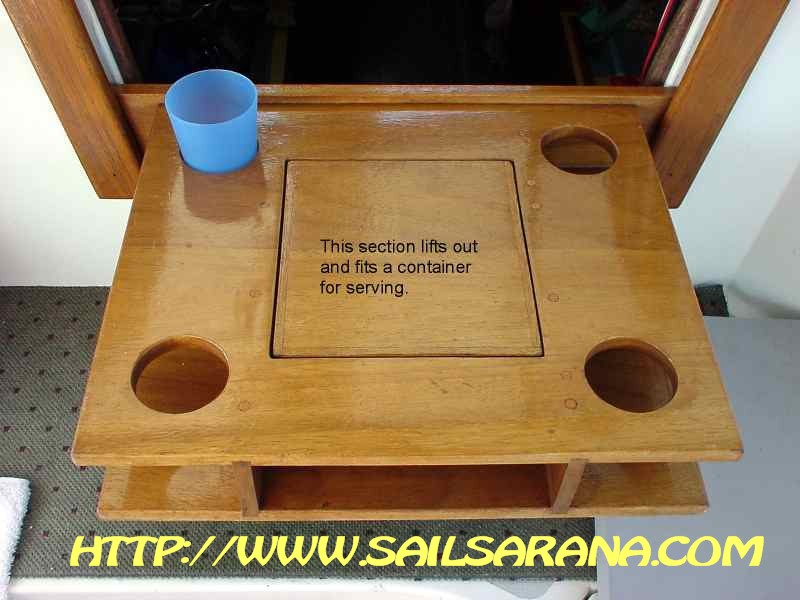
You can eat from it, use it as a chart table, even sit on it during your night watch and hide from the nasty weather! This table Sherrell built from a plank of wood drops right into our companion-way door slots.
It's great! We leave it in all the time, even the cat likes to sleep under it, and everyone wants one. Don't you?
Sherrell designed it to have a center panel that pops out and a nice Rubbermaid container drops in perfectly. So food can be prepared down below, put in the container and then plopped into the table for serving!
It really is the greatest. We got the idea from a book, but we enlarged it into a full-sized table.
Make Your Own Boat Cards
Cruisers trade them like candy; if you want to seem like a "somebody" get some. People put their names, addresses, email contact and maybe a photo or something on them. It's a small slice of immortality to leave with others. Of course, if you're not interested in spending a small fortune on some glossy full color professional job, you can make your own. All you need is a little help from a printer and something to cut the cards with. A nice guillotine style cutter makes the job a snap.
You can start by modifying one of our Word templates! This template has 8 per page and has lots of room to cut the cards into whatever "proper" size you want. This second template has 10 cards on a page, and they are easier to cut out, however they turn out a tiny bit smaller than a standard size card. Feel free to do what you like with the template. I made the graphic (shown to the left) from the drawings for our Mariah 31 and used it on our cards.
Life-line Tension -- How tight to make them?
This little item doesn't really fit in anywhere in our website, but it is an answer I sent to a question poised in Practical Sailor. There was a heated discussion about how tight to make your lifelines. In essence, it doesn't really matter because the cable will stretch if any serious force is applied and having them tight only pre-loads the cable tension by about 20 pounds. However, if you have the lines a little loose already, your cables will experience a little less stretch when force is applied.
Practical Sailor asked for someone to explain the forces involved and how to calculate them, so I sent them this Word document with my formulas. Someone out there might find it interesting, who knows?
Sun Shades
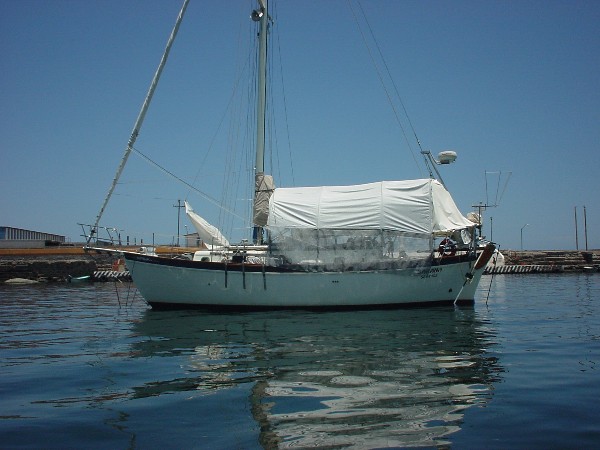
I never thought I'd want our boat to look like a gypsy boat, or even less, a covered wagon. But after soaking in the 100F weather, we found that a good sun shade can keep the boat 10 degrees cooler and we didn't burn our bare feet on the deck! Of course we bought the Shade Tree but we added some home made covers that make a little more shade.
The back cover is a combination of velcro and rope ties that attach to the Shade Tree, it gives us better 360 degree shade in the cockpit. The side shades are plastic screen material, which at first glance we didn't think would block out much heat, but they made a huge difference and they still let the air flow through. The screens are also use velcro straps to attach to the Shade Tree.
All the velcro makes them quick to remove. With all the covers up, we can tear them down in less than 10 minutes if the wind starts to blow. Git 'm on, move 'm out, raw hide.
Make your own hookah!
Unless you're Aquaman, you might appreciate breathing underwater. There are several low-cost options for making your own system depending on your requirements. I haven't had the chance to find equipment that meets our needs yet, but I've put together my ideas and research in one spot to share with anyone who is interested. Depending on how deep and how many people you want for your system you can probably build a good solution anywhere from $500 to less than $100.
Thinking about making your own hookah for diving? Here's some ideas to get you started!
Here's the best site I found with an overall breakdown of equipment.
General requirements for the compressor:
max psi 100-150,
CFM >1.5 at 45psi (CFM of 4-5 is ideal for 2 people).
The higher the CFM you get more air flow for adding additional divers. Usually you need something around 3/4 to 3 Hp to get the CFM high for deeper dives (to get 2 people to 30ft, you need about 4 CFM at 45 psi). But if you're just cleaning the bottom, then 1.5 at 45psi, is fine. 45 psi is about 30 feet deep.
Horse power is usually around 1 to 3 for a multi-person 30+ foot deep unit.
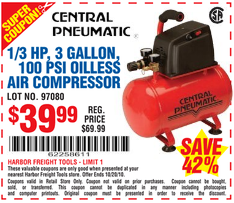
As an example for simple bottom cleaning system take a look at Harbor Freight's two 3 gallon 100psi compressors.
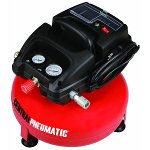
On the left is the 1/3 Horsepower, 3 Gallon, 100 PSI Oilless Pancake Air Compressor Central Pneumatic - item#95275 120V and 2.6A 0.6 CFM at 90 PSI (Can do short dips down to 60 feet or so with 3 gallon tank) 1.0 CFM at 40 PSI (Good enough for bottom cleaning) 1/4"-18 NPT female connection The model on the right is similar. $89.99 normal, sale at $64.99 at harbor freight or this other model at $39.99 with coupon #48049191Filters:
Get a air-oil-water separator like this $8 one from to keep any rusty tank moisture from coming down the line.
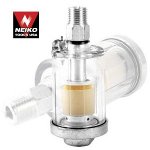
A 40 micron filter for $10 isn't a bad idea either.
These filters remove any condensation and particles from the compressor.
Education:
Get an open water PADI or NAUI license to learn safe underwater skills including avoiding nitrogen narcosis or the more lethal nitrogen poisoning. Diving beyond 30' poses a serious risk of nitrogen narcosis but it can easily happen in shallower depths, so use caution.
Reserve tank: If you do not have a compressor with a built in tank, you'll want something to help store the air. The best tank I saw was made out of material like hypalon and could be rolled up. When it was in use, you can run a hose from the compressor to the tank, then from the tank to the diver. This allows the tank to sit on the water (helping to cool off the compressed air). And it rolled up nicely. It's called the Sea Breathe. With the flexible tank, the overall operating psi has to be limited which reduces the depth you can reach. The Seabreathe units only go to about 20feet or so. I've used one, and when you dive deeper, you have to either breathe really slowly or hold your breath below about 35 feet.
Regulator: The easiest solution is to use an adjustable second stage regulator like: Scuba Max OT-4XOS Diver Adjustable Second Stage Regulator for $80 (including air hose)
If you can't get an adjustable regulator, some scuba shops can change the springs for lower pressure operation. A standard regulator is setup for 100psi, you'll want something lower, around 30-40 psi.
Hose: Cheap PVC hose line is fine for a simple hookah. The cost is only $16 for 50'.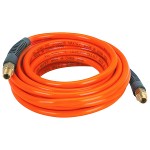
YOU MUST PREPARE THE PVC HOSE PRIOR TO USING IT!
Follow these steps:
- Uncoil the hose into 5 or more large hoops and lay them flat, on a hot sunny day – get them as hot as possible.
- Allow the hose to warm up for 30 minutes, then squirt a solution of 1 quart of warm water mixed with 2 ounces of Simple Green completely into the 50' hose. Cap the ends once all of the solution has been added.
- Allow the hose to get a 5 minute internal soak while giving it a few shakes every now and then.
- Then flush clean with clear water and run air through it for 5 minutes.
- Let it warm up again the same way as in step 1 & 2 but no more solution or water is needed. Flush it with air and let it dry once it is hot. This should remove all or most of the off-gassing industrial compounds that cause these hoses to leave a vinyl taste or plastic smell in the air supply.
Fittings: use the bronze or stainless NPT type fittings everywhere and they'll be compatible with the scuba regulator. You'll need to go from 1/4"-18 NPT to 3/8 for the regulator's hose. Example high quality adapters (cheaper options can be found...harbor freight Item #68205 for $2): male adapter or female adaptor.
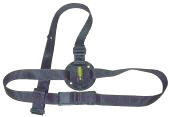
Belt/Harness: Hoses float, so the belt needs to keep the hose out of the way and keep it from floating off without you. Something with some nylon webbing and some lead fishing weights should do it. A harness that can keep you from getting tangled with the hose. Typically the harness also has the adapters to go from 1/4” hose to the 3/8” Second stage regulator hose. You can make one easily. The connections are in the back and the regulator hose runs around to the front. The one below is $44.
Floats: In may third world places, you can still buy inner-tubes. If you have gas powered compressor you just have to keep the waves and water away from the motor and compressor....General Info:
You've got to keep the exhaust away from the air intake on a gas powered model. Some units add a pipe or hose to pull clean air from a few feet away from the exhaust.
For more info click here and see hookah section and links.
Another example compressor (according to them 2hp is a minimum, but it's probably overkill for 1 diver < 30 feet.)
I've looked around some here in Mexico for options. Some of the compressors I've seen that come close are usually for pneumatic tools and paint sprayers. But the selection is so small that I can't find one with enough CFM. But they are all oil-less and some have a high psi. Remember the higher the psi rating, usually the lower the CFM rating. You only need to operate it at about 45 psi for 30ft., so if it can get to 80psi or so, then it probably will work ok.
I suspect a good system will probably run you about $350 to $500. I was hoping to get something for about $100, so I've decided I'll just practice holding my breath instead. If we had lots of room on the boat for it, I'd probably try making one. A really cheap hookah for just going <10 feet could be built using a 12V truck tire inflator and a reserve tank of some kind. You could probably put that system together for $100.
(Example compressor specs here).
However, for shallow water hookah action, you could probably use a 1/2, 3/4 hp unit with a good sized reserve tank and get one person to 25-30 feet pretty comfortably.
What's on the Horizon?
Here's a few things that we're currently working on or investigating:
Water Towed-Generator -- Using a permanent magnet motor off Ebay for about $40 and some old parts from a prop shop, we built up a water towed-generator for about $60 (retail is about $1200). It works well, but I'd like to adjust the pitch on the prop to make it a little more efficient for our typical boat speeds. We'll post a very detailed article on it once we're happy with it.
Thermoeletric Cooler -- We've mocked up a new lid for our built-in ice box that has a thermoelectric plate, two fans and a controller. The goal is to help pump out the heat and aid the ice in staying cool. We're almost at the stage of testing it. UPDATE 3/3/07 -- we really weren't happy with the power consumption of the end result so this one has been shelved for now.
AIS Receiver -- All ships 300 tons or greater carry a AIS transponder that sends out their name, size, position, speed and course. All you need is to receive this bit of info is a cheap scanner (with a discriminator output) and a PC. You'll also need to replace the IF Filter inside the radio with one that has 25Khz or 50Khz bandwidth, otherwise you'll get occasional errors in the data stream. The IF filter is typically a metal can with 2 or 3 pins and has a number like 10.7 or 10.1 stamped on it to indicate the center frequency. You can measure the size and then order a wider bandwidth filter from an electronics place like Digikey. The ships broadcast at 161.975 and 162.025 MHz 25Khz bandwidth you can try receiving the data with some software: ShipPlotter. A company called NASA makes a receiver that makes a nice graphic plot of shipping traffic around you. More info here too.
NOAA Satellite Weather -- using a scanner to pick up 137.620 Mhz, 137.50 Mhz with a 50Khz bandwidth and some software: WXSAT and WinOrbit, one could receive NOAA's weather via satellite, which often has less noise than the HF broadcasts. There's a short guide here.
Tri-Color LED Light -- We recently bought a used Tri-Color light, and we have the LED's to modify it, now it's a matter of finding time to work on it, how to mount it, and wire it up.
LED Nav. Lights -- I've made bulbs for replacing the red and white colors, but we haven't had a good chance to swap out the old ones and compare their performance.